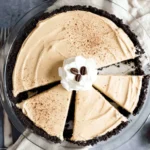
No-Bake Coffee Pie: A Creamy Dream Come True
As the golden leaves begin to dance in the crisp autumn breeze, there’s nothing quite like the warmth of a cozy kitchen. Memories of family gatherings, old recipes, and warm desserts flood in, and perhaps nothing brings back that delightful nostalgia quite like this No-Bake Coffee Pie. With its rich, creamy filling and a buttery Oreo crust that hugs your taste buds with every sweet bite, this dessert isn’t just a treat — it’s a comforting hug on a plate. Perfect for those easy weeknight dinners or festive gatherings, it’s a recipe you’ll want to add to your rotation. This is one you’ll definitely want to pin for later!
Why You’ll Love This Recipe
- Quick and Easy: Perfect for when you’re pressed for time but still want to impress your guests.
- No Baking Required: Skip the oven and let your freezer do all the work!
- Coffee Lovers’ Dream: If you’re a fan of rich coffee flavors, you’ll fall head over heels for this indulgent treat.
- Crowd-Pleasing Delight: This pie is sure to be a hit at any gathering, whether it’s a holiday feast or a summer potluck.
- Perfectly Creamy Texture: The combination of whipped cream and sweetened condensed milk creates a luscious, melt-in-your-mouth experience.
- Easily Customizable: Let your creativity shine with fun variations and toppings!
Gather These Simple Ingredients
For this delightful No-Bake Coffee Pie, you’ll need the following:
- 1 cup heavy cream
- 1 can sweetened condensed milk
- 2 tablespoons espresso powder
- 1 teaspoon vanilla extract
- 1 package Oreo cookies (for crust)
- 4 tablespoons butter (melted)
How to Make No-Bake Coffee Pie
Let’s bring this cozy dessert to life! Follow these easy steps, and soon you’ll have a slice of heaven waiting in your freezer.
Start by crushing the Oreo cookies into fine crumbs. Mix these crumbs with the melted butter to create a dark, tempting crust. Press the mixture firmly into the bottom of a pie dish to form an even layer.
In a mixing bowl, whip the heavy cream until stiff peaks form, creating a fluffy, dreamy texture that will become the lightness in your pie.
In another bowl, combine the sweetened condensed milk, espresso powder, and vanilla extract. Mix until everything is beautifully incorporated, creating a sweet and aromatic blend.
Gently fold the whipped cream into the espresso mixture, taking care to preserve the airiness of the whipped cream. Together, they will create a rich filling that perfectly balances sweetness and coffee flavor.
Pour this delightful filling into the Oreo crust, smoothing the top with a spatula. Make sure it looks as good as it tastes!
Pop your creation into the freezer for at least 4 hours or until firm. Waiting is the hardest part, but trust me; it’s worth it!
Once frozen, slice, serve chilled, and watch everyone melt with delight.
Delicious Variations to Try
- Chocolate Chip Coffee Pie: Add a handful of chocolate chips to the filling for a delightful texture and extra sweetness.
- Hazelnut Indulgence: Swirl in some hazelnut spread for a nutty twist that deepens the flavor.
- Vanilla Almond Crust: Swap the Oreo crust for an almond cookie crust for a wonderfully nutty taste.
- Mocha Mint Delight: Add a few drops of peppermint extract to the filling for a refreshing minty kick.
Chef Emma’s Helpful Tips
- Make-Ahead Magic: This pie can be made up to a week in advance. Just keep it covered in your freezer until you’re ready to serve!
- Ingredient Swaps: Feel free to replace the espresso powder with your favorite instant coffee if you’re in a pinch.
- Slicing Tips: Run your knife under hot water before slicing. This will help create clean cuts, so everyone gets a beautiful piece.
- Storage Suggestions: Store any leftovers in a tightly sealed container in the freezer for up to a week. It’s just as delicious when you take it out later!
What’s Inside – Nutrition Breakdown
Here’s a quick look at the nutrition information for each serving of this luscious No-Bake Coffee Pie:
- Serving Size: 1 slice (1/12 of pie)
- Calories: 320
- Carbohydrates: 42g
- Sugar: 20g
- Fat: 16g
- Protein: 4g
- Sodium: 150mg
Reader FAQs About No-Bake Coffee Pie
Can I make this ahead?
Absolutely! This pie can be prepared in advance and stored in the freezer for up to a week.
Can I use different ingredients?
Yes, you can substitute the espresso powder with your preferred instant coffee or try different cream flavors.
How do I store leftovers?
Keep the pie covered in the freezer for best results. Make sure it’s tightly sealed to avoid freezer burn.
How long does it last?
This pie is best enjoyed within a week when stored in the freezer.
A Cozy Closing Note
This No-Bake Coffee Pie is not just a recipe; it’s a celebration of comfort and flavors that bring warmth to our hearts and homes. The rich coffee notes and creamy texture will leave you dreaming of cozy gatherings and holiday memories. Remember, it’s the simple joys that often hold the most sweetness in life. Save this No-Bake Coffee Pie to your Pinterest board so it’s ready when you need a cozy treat! Enjoy every indulgent bite, and happy baking!
No-Bake Coffee Pie
- Total Time: 240 minutes
- Yield: 12 servings 1x
- Diet: Vegetarian
Description
A creamy, rich No-Bake Coffee Pie with a delightful Oreo crust that will satisfy coffee lovers and impress your guests.
Ingredients
- 1 cup heavy cream
- 1 can sweetened condensed milk
- 2 tablespoons espresso powder
- 1 teaspoon vanilla extract
- 1 package Oreo cookies (for crust)
- 4 tablespoons butter (melted)
Instructions
- Start by crushing the Oreo cookies into fine crumbs. Mix these crumbs with the melted butter to create a dark, tempting crust.
- Press the mixture firmly into the bottom of a pie dish to form an even layer.
- In a mixing bowl, whip the heavy cream until stiff peaks form, creating a fluffy, dreamy texture.
- In another bowl, combine the sweetened condensed milk, espresso powder, and vanilla extract. Mix until beautifully incorporated.
- Gently fold the whipped cream into the espresso mixture to preserve the airiness.
- Pour this mixture into the Oreo crust, smoothing the top with a spatula.
- Pop your creation into the freezer for at least 240 minutes or until firm.
- Once frozen, slice, serve chilled, and enjoy!
Notes
This pie can be made in advance and stored in the freezer for up to a week. Feel free to customize with your favorite toppings.
- Prep Time: 15 minutes
- Cook Time: 0 minutes
- Category: Dessert
- Method: No-Bake
- Cuisine: American
Nutrition
- Serving Size: 1 slice
- Calories: 320
- Sugar: 20g
- Sodium: 150mg
- Fat: 16g
- Saturated Fat: 10g
- Unsaturated Fat: 6g
- Trans Fat: 0g
- Carbohydrates: 42g
- Fiber: 1g
- Protein: 4g
- Cholesterol: 40mg